Making stout into cake

Yes, I really did bake two cakes this week. The second one was for my husband’s birthday. This is the second time I’ve made this chocolate stout cake from use real butter.  Yes, the recipe really is in that blog post after you scroll past all of the pictures.

This year, I changed two things from what I did last year. I substituted half of the butter for applesauce to make the cake moister (which worked) and I used a milk chocolate icing that my husband bought rather than the fudge icing I used last year. I recommend the fudge icing. Both years I used Guinness in the cake because we happened to have some and it’s not fancy enough for my local beer snob to drink.

Guinness, butter, and applesauce, oh my!

Heating the stout and butter, and then after the butter melted, adding the applesauce:

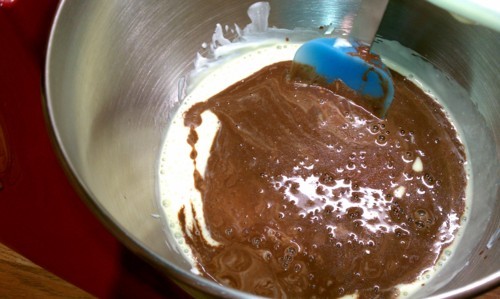
Mixing in the cocoa powder:

Mixing eggs and sour cream:

Adding the chocolate mixture:

Ready for the oven!

Out of the oven!

First layer iced:

Done!

Making a breakfast birthday cake

I got to do some more baking recently for a coworkers birthday. This baking was special because the celebration had to be at 9:30 am.  So instead of a dessert cake, I came across this Cinnamon Apple Cake recipe from Cooking Light that is perfect for breakfast! Also, I was amazed by the insane number of outstanding reviews it had, so I knew I just had to try it. An added bonus is the fact that the cake is relatively low in calories.

My husband bought the largest organic Fuji apples I have ever seen so I ended up chopping up just two of them and still had way more than the 3 cups called for. To make apple chopping easy, I used my peeler / slicer / corer contraption from Williams Sonoma, given to me a few years back by my mother-in-law. That thing rocks if you bake with apples often!

So many apples…

Dry ingredients combined:

(P.S. My apple corer contraption is the same red as my Kitchen Aid mixer, another awesome baking gift from my mother-in-law)

Mmmm… apples all cinnamon’d up and ready for use!

Folded into the dough – I noticed this recipe seemed to have more apples than dough, which of course makes it delicious. Also, I used extra apples. I spread some on top too because I had so many. And maybe I ate a few of the chunks.

The cake was baked in my 9” springform pan and that worked out just fine. I think next time I will bake it for a bit longer because I don’t think it was quite cooked all the way. I subtracted the 5 minutes for my larger pan as the recipe suggested but I think that was too many.

It earned rave reviews from my coworkers (and myself). Definitely worth making again.

Tonight’s hummus was made with edamame instead of chickpeas

Tonight’s hummus was made with edamame instead of chickpeas. So it’s probably more like a sandwich spread / dip than hummus, but it’s still delicious! The ingredient list was frozen edamame (cooked in the microwave), a bit of olive oil, plain yogurt, two very large garlic cloves, kosher salt, thyme, and some crazy spice mixture I unearthed from the cupboard.

The end result is very green and very tasty.

Making cheese and chocolate fondue

Cheese and chocolate fondue for Valentine’s day. This is the second year for cheese fondue and the third for chocolate fondue. I declare it therefore to be our Valentine’s Day tradition. The tradition guarantees that we will use our fondue pot from Switzerland at least once a year which was an awesome wedding gift (despite the fact that the first time I picked it up, the handle broke off).

I never thought I liked cheese fondue. In fact, I don’t like cheese fondue made with wine. We learned last year that cheese fondue made with beer is far superior to fondue made with wine so now we make it with beer.

To make the cheese fondue, we combined cheddar, Gruyere, and Emmentaler cheese with a bit of flour, mustard, Worcestershire sauce and Sierra Nevada Glissade beer. Well, that was after an emergency trip to Bed Bath and Beyond for the sterno fuel needed to keep the pot warm.

Cheese!

Beer!

Melting cheese!

For some reason the fondue did not melt together quite as well this year as last year but it was still quite tasty.

We ate the fondue with cauliflower, broccoli, carrots, and zucchini that I blanched in boiling water as well as baguette bread and mini dill pickles. Yum! We drank Boston Beer Company Infinium along with our fondue.

For our dessert, we made chocolate fondue. Ok, so it really was just melted milk chocolate.  Apparently real chocolate fondue has cream in it but that was not something I realized. The chocolate fondue pot is a little heart shaped dish that is kept warm by a tea light candle

In our chocolate we dipped strawberries, banana, grapes, mini marshmallows and mini ginger crisp cookies.

The best part? The left overs we will eat again on Monday which is the actual Valentine’s day!

Making Super Bowl Food!

As everyone remembers, yesterday was the Super Bowl. We hosted a party at our house. Unfortunately for me, my Steelers lost but it was a good game and it’s hard not to like the Green Bay Packers (well, except when they beat the Steelers, then it’s easier). Fortunately for me, our Super Bowl food was a hit! I prepared Kung Pao Tofu Sliders and my husband made pulled pork with pickled onion sliders. Both were quite delicious if I say so myself.

Making Kung Pao Sliders

The recipe from the latest issue of the Vegetarian Times magazine. The sliders are made of marinated and baked tofu squares and a carrot and zucchini slaw.

First, I spent way too much time julienning carrots and zucchini. I wonder if it would have been okay to shred the veggies with my food processor instead.

Then they were mixed with the crazy dressing that had soy sauce, sesame oil, peanut butter, mayo, natural cane sugar, garlic, cayenne powder and probably other things I can’t remember. The slaw chilled overnight.

On Sunday, I cut up two packages of extra firm tofu into small squares.

It was marinated in soy sauce, sesame oil and sugar.

It was then baked for 25 minutes on each side. After that, assembling it with the slaw and bun proved it was absolutely delicious! You can see the pulled pork slider in the picture as well.

Slider buns are tad tricky to find, so we used “brown-n-serve” rolls from HEB, our grocery store. They were cheap and perfectly sized!  And now we have them left over for dinner for most of the week, yum 🙂

Making tacos from left overs

Last week we made tacos from dinner from our taco cookbook. They were good. We ran out of filling before running out of tortillas so this evening I threw together some veggies we had lingering in the fridge to make a new taco filling. I guessed right because the new filling was delicious!

Process:

Slice up a sweet onion and a part of sweet potato into thin pieces and saute. After they are cooked, add handfuls of spinach and cook until wilted. Top with salsa and cotija cheese. Yum!

Filling:

Ready to eat, one sweet potato/onion/spinach taco and one taco from the taco cookbook:

Today’s hummus flavor is…

As you may remember from a previous post, I make hummus fairly regularly.

Today’s flavor is caramelized onion. The ingredients were chickpeas, lemon juice, a caramelized sweet onion, yogurt, a dash of olive oil, dash of kosher salt, dried thyme, parsley and oregano.  The onion gives the hummus a slightly sweet flavor that I enjoy.

Smoky beet cakes – a lucky new years food!

Link: Smoky beet cakes – a lucky new years food!

On New Years day I like to make us foods that are considered lucky. For some reason I decided that beets were lucky without actually knowing if that’s true or not. Really I just wanted to make this beet cake recipe. It was fun because of the food processor and the fact that I got to turn my hands dark red by forming beet patties.

I only have a picture of them with the rest of the food from that day. They were quite tasty and would even make good veggie burger patties!

Trying to replicate fat free ginger cookies

The Whole Foods near us makes these absolutely amazing fat free ginger cookies. The fat free-ness of the cookies is not the draw for me, but rather their wonderful texture – a bit firm around the edges and perfectly chewy on the inside. These cookies are not anything like ginger snaps. In fact, the cookies are so good that when I decide I want one and the store doesn’t have them I get kind of upset. Just ask my husband.

Before Christmas I decided to try to find a recipe for to make these cookies at home. Of course the internet delivered because others apparently have the same fetish for these cookies. They’re that good. Here’s the recipe from David Lebovitz that I used.

I’ve now made these cookies twice. If you read that recipe, I haven’t tried cooking down the applesauce, but I intend to next time. I also have not used the candied ginger. Instead, I just use a bit more ground ginger and cinnamon. I figure you can’t get enough of those delicious spices.

The first time I made them was when we were at my Mom’s house in Ohio for Christmas. They came out pretty well, although they were a bit softer than I wanted them to be after baked.

The second time was just this past weekend. This time, the dough wasn’t as sticky after being mixed up. I think it needed to be stickier. My guess is that the egg whites I used here were smaller than the ones I used at Mom’s (I think they were different sized eggs). Then I refrigerated the dough for more than a day so that probably made it even less sticky.

Once the cookies were done baking, they hadn’t spread out this time like they were supposed to. I had to take a cup and smash them so they were somewhat flat. Despite that, the texture of these cookies was better than my first attempt with the outside being firmer and the inside chewy. Because the cookies didn’t spread they are pretty small looking. Next time I will roll them into larger balls to start. I’ll probably also try adding a third egg white because we use smaller eggs at our house.

The dough after being mixed:

Making the balls and rolling them in sugar and cinnamon:

Ready for the oven:

Out of the oven and squashed by a cup:

And finally, the chewy center:

Making my own vanilla extract

I like to bake. I try not to do it to often because I REALLY like to eat what I bake. Luckily, we bring baked goods to work for co-worker’s birthdays so I can bake and share fairly often.

That means that I go through a lot of vanilla extract. Recently, I came across an article in an old print version of Craftzine (this link doesn’t work on mobile devices) that tells you how to make your own vanilla! Of course I had to try it. Supposedly you make so much that you can even give batches away as gifts.

The instructions in the magazine are pretty detailed so I won’t rewrite them all.

To prepare to make my own vanilla, I first purchased 1/2 lb of vanilla beans (planifolia) for super cheap at Vanilla Saffron Imports.

I also picked up a handle of Tito’s Vodka and a 4 oz bottle of Nielson-Massey Vanilla extract.

The ingredients:

The article recommends seeding your vanilla batch with good vanilla extract that you’ve purchased to make the process go faster. I did that, but only used half of my extract bottle and instead doubled the beans that I put in my jar.

My jar filled with 2 oz of vanilla extract, 12 vanilla beans split down the middle and then topped off with Tito’s Vodka:

After 4 – 6 weeks I should be able to pour some vanilla out of this jar for use in my normal baking exploits. Each time you do that, you can top the jar back off with vodka.  For now, I’ve stored the remainder of my vanilla beans with some sugar as the package recommends. Hopefully they’ll still be good when I need them for my next batch. I’ve not worked with vanilla beans before. I’ll let you know how this experiment turns out.