

When we moved in to this house in April 2012 I set a goal to renovate the kitchen at the 5 year mark. And we did! So now you get to read all about it, see the before and after photos, and see how our 5 year dream finally came true.
First, I knew that I wanted to make the kitchen more open to the rest of the house and since that involved restructuring walls, we hired an Architect / Designer to create new plans for our kitchen. As you’ll see in the photos, the design included restructuring the pantry to open up the dining room opening, removing the drop ceiling, opening up the wall next to the stove, removing the wall between the living room and kitchen, and installing pocket doors in the laundry / half bath area. We are extremely pleased with the layout as the kitchen is now the focal point of the house. We highly recommend working with a designer if you’re doing more than just replacing what already exists.
As for the actual renovation process, it took much longer than initially planned. I’ve always heard that Texas houses have foundation problems and it seems the walls and floors in our house may suffered some of this fate as nothing in the house was level or square, leading to extra work throughout the process. The Austin permits also have certain construction requirements so we also had to upgrade the electrical service into our house. However, the biggest overrun in our budget wasn’t cabinets, or countertops, or electrical – it was our contractor’s labor. Lesson learned: Understand your contractor’s confidence in their estimate and what the process is to notify you if they are headed for an overrun. That’s the least fun part of the kitchen remodel… so let’s get to the fun stuff: the before and after photos! Oh, and I guess play the game of how many pets can you count in the photos.
Before
In the original kitchen layout, the opening from the dining room into the kitchen was very narrow and if the fridge was open no one could get through.

The kitchen suffered from the fate of many kitchens in our area – a drop ceiling! We previously removed the ugly fluorescent fixture and put in a new fixture. Last fall, we replaced all the windows in the kitchen and half bath and put in a back door with a window.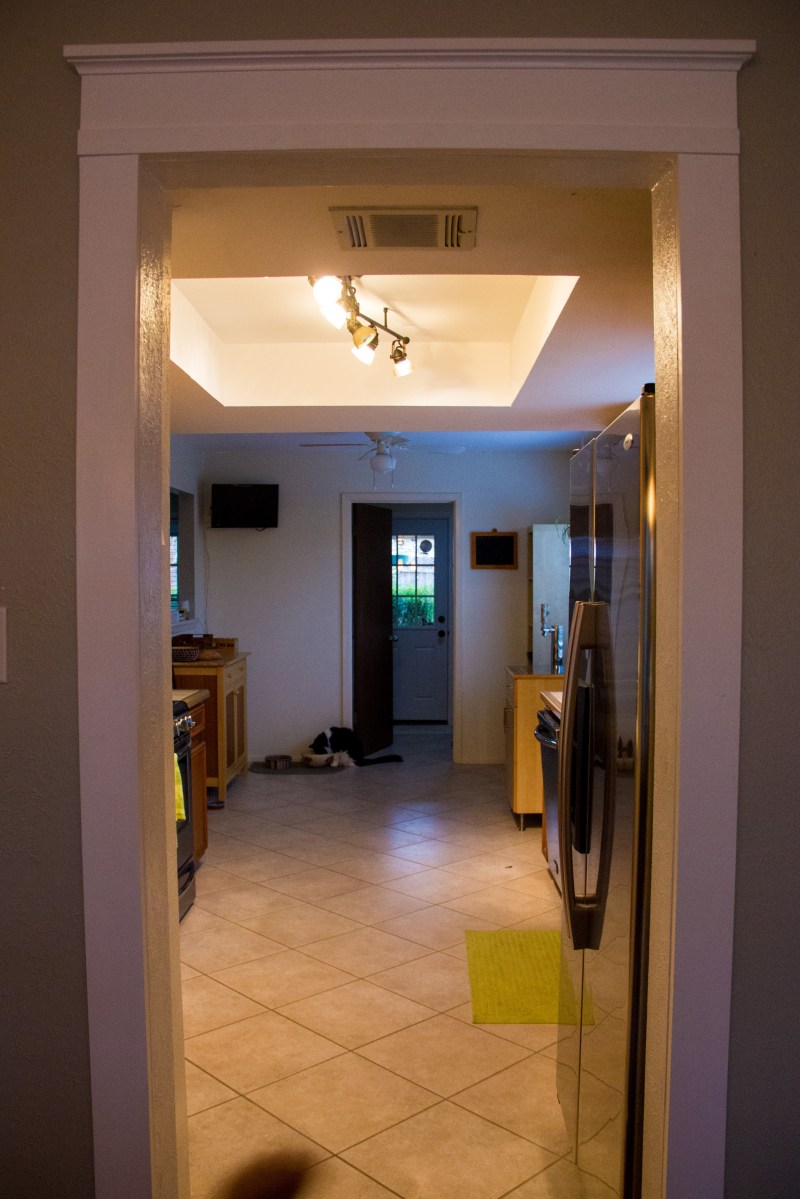
The house had the original oak builder cabinets, and ugly yellow tile countertops with brown grout.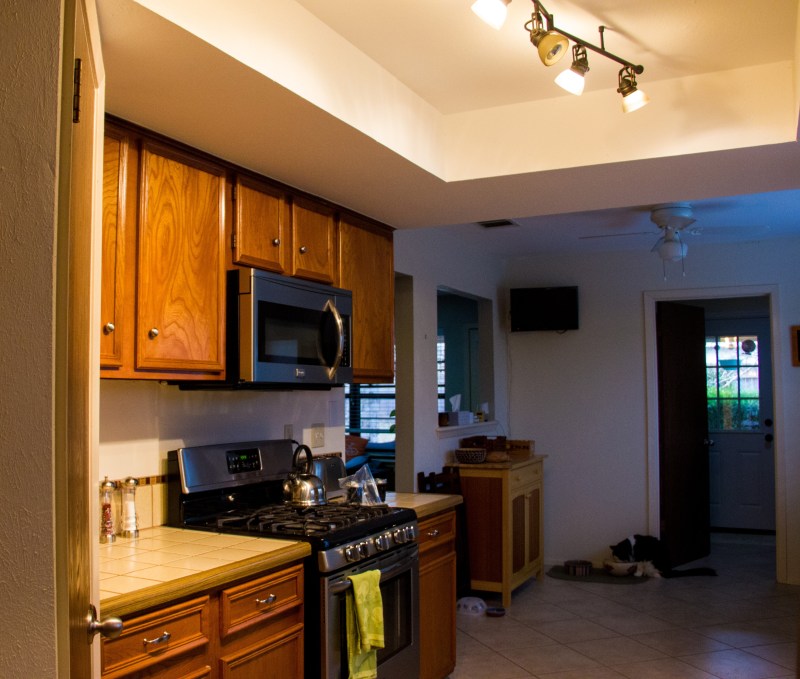
The area of the kitchen next to the laundry room was meant to be a dinette, but we never used it for that so we had a random assortment of furniture in that space.
Looking back towards the dining room. The pantry is behind that ugly brown door at the end of the kitchen.
The kitchen sink was one of those sad, small stainless steel sinks with a tiny little faucet. The water also took forever to get hot, like minutes, because the hot water tank is at the opposite end of the house.
I love this large window so we made sure to frame it in the new kitchen.
Across from the large window is the opening into the living room, which used to be a doorway and an interior window with a narrow ledge. 
In prep for the new kitchen, we bought a stacking washer and dryer set. The laundry room had ugly metal cabinets on the wall. The half bath is also accessed from the laundry room. Both had ugly brown doors that would hit each other when you would open them both. It was awesome. 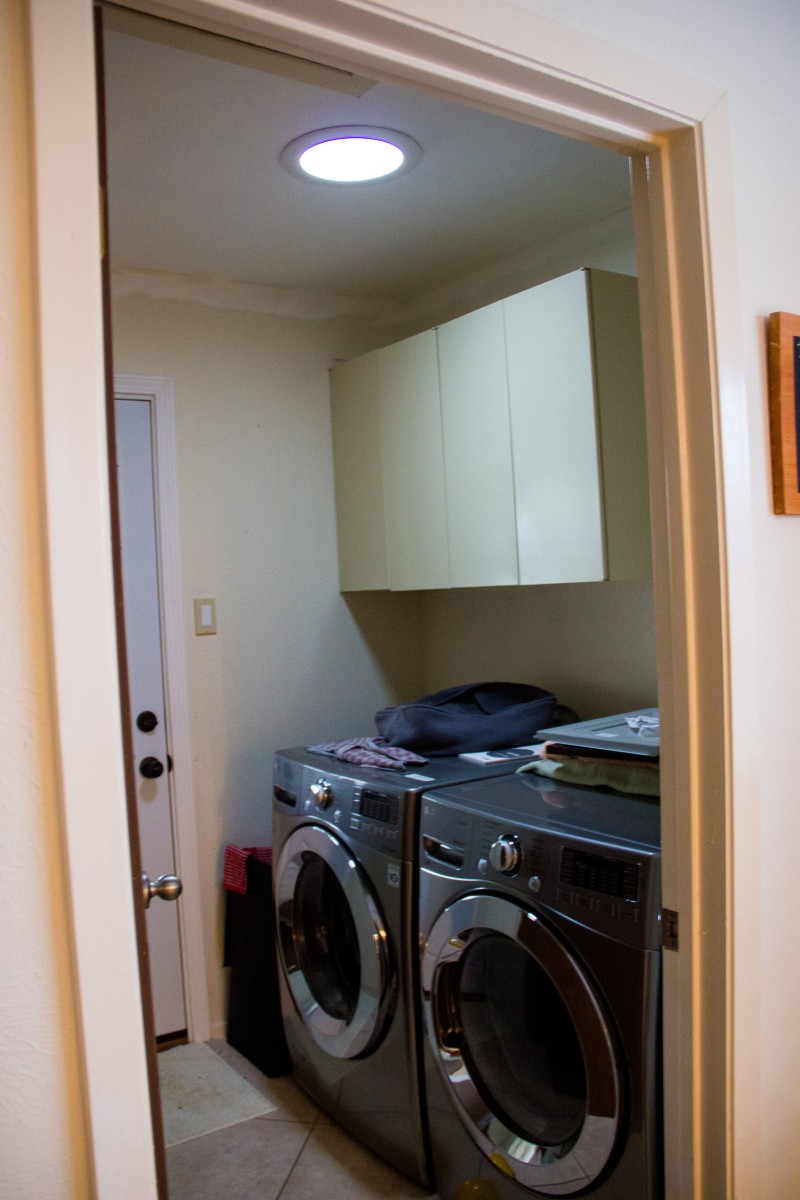
Looking from the living room into the kitchen.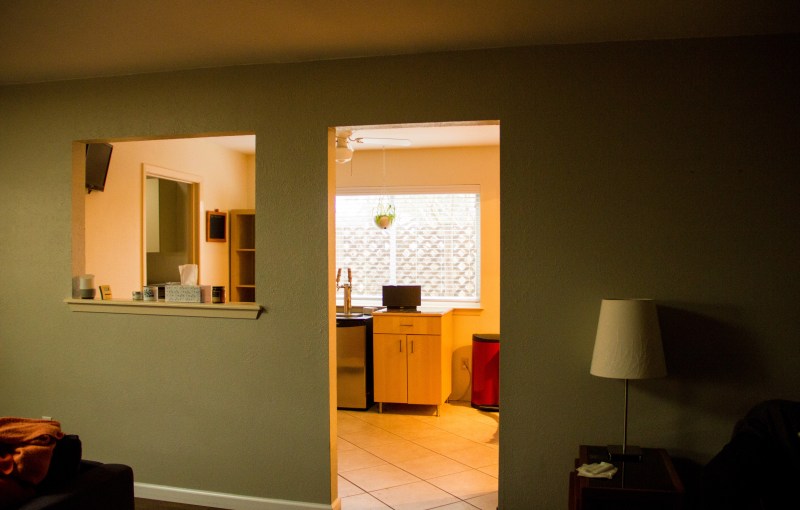
Kitchen Goals
Now that you’ve seen our old kitchen, you can probably imagine what we wanted out of our kitchen renovation. In case you can’t, here are the goals we set:
- Replace all cabinets, countertops, and flooring
- Widen the opening from the dining room into the kitchen
- Open up the kitchen into the living room
- Remove the drop ceiling
- Install good lighting
- Create a bar area for entertaining – with a beer fridge and wine cooler
- Install a utility sink in the laundry room
- Fix the door problem in the laundry & half bath
- Match the aesthetic in the rest of the house
After
And now for the exciting part… what it all looks like now! If you can’t tell, I struggled a bit with the differing lights causing issues with my camera’s white balance, especially because some of the photos were taken at different times of day. Some of the photos are probably a bit too yellow – I’ll have to fix that one of these days.
First, the view from the dining room. The doorway was widened which meant that we had to swap the location of the wine rack and the glassware cabinet.

Goodbye to the drop ceiling! Look at those lovely LED can lights! You can sort of see the under cabinet lighting, LED strips, under each of the upper cabinets in the kitchen. We also ended up with a new fridge because the old one was damaged during demo. The cabinets above the fridge and the panel on its left side make the fridge look built in, and the cabinets have special vertical dividers for baking pan storage.

The pantry wall was squared off in place of the original diagonal wall and we had a custom barn door made to match the colors in our house.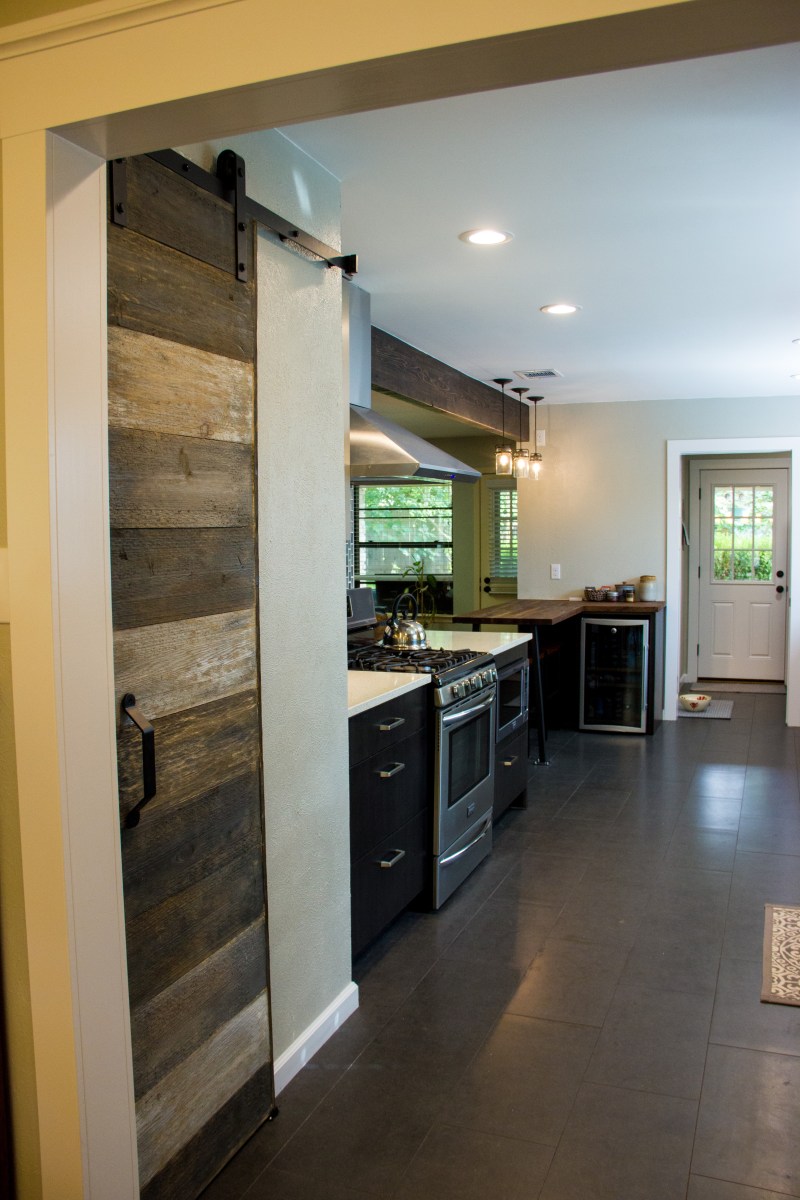
We selected cabinet colors that are light gray on the uppers and a dark grayish / brown color on the lowers. Both cabinet types have a dry brush finish.

Most of the backsplash tile is a 3″x6″ subway tile in seafoam green. I’m really happy with how that color brings out the bits of recycled glass in the countertops that have a faint green color to them. The countertops are GEOS recycled glass in White Birch by EOS. We put an accent tile behind the stove that you can see in the next photo. Our sink is a granite composite in dark gray with a kitchen faucet that I love made by Delta. We debated getting a faucet that you could tap on and off but ultimately decided against it out of fear of the cats turning it on when we weren’t home. Cats – the reason we can’t have nice things.

We got rid of our over the stove microwave and instead installed a nice stainless steel vent hood and put the microwave under the countertop. The countertop above the microwave overhangs the half wall a bit into the living room, making for a nice large space. In the old layout, the wall went to the edge of the counter so the cutout above that counter is new and gives a better view of the living room and TV. We’re happy with how the accent tile matches the subway tile and decided to have the tile installed vertically. We purchased the tile locally at the Tile Shop.
I picked up a “build your own dividers” kit at the container store and organized the heck out of the utensil drawer. Which is good because without the organizers it felt like the drawer was way too full and sometimes wouldn’t close.
And now for a glimpse into the pantry. I planned a shelf specifically for pet food containers since each cat gets a different type of food (I know, I know…). We also had outlets put in the pantry and now keep our toaster on a pantry shelf and use it in the pantry. The outlets forced our pantry shelves to be spaced out vertically quite a bit so I got inventive with some other pantry storage solutions from the Container Store. My new 2 step step-stool lives in the pantry as well and gets a ton of use.
Here you can see one of the sets of floating shelves. They are Lack shelves from Ikea that I sanded, primed, and painted to match our upper cabinets. We had to cut them to size to fit in our space, which meant that we didn’t get to use as many support screws as we probably need. The shelves did not end up being very sturdy so I will be looking into a replacement solution.

The far end of the kitchen is the bar area! The set of drawers and cabinet next to the wine fridge are where we store our liquor bottles and random jars / other glassware that I use for storing infusions and such. We had the spacing between the pull out shelves of the liquor cabinet adjusted to fit a bottle of St. Germaine, so almost all liquor bottles will fit.
Across from the wine fridge area is the butcher block bar top! The L shape gives us a convenient spot for a beer fridge and space to have 3 counter height stools for when we’re entertaining. It also makes a great place to sit and eat if you’d like to watch TV. Our contractor installed the butcher block, which is Walnut and purchased at Floor and Decor. I took care of the sanding and finishing – I used Howard Butcher Block Conditioner which is a combo of oil and wax. It has to be reapplied often but I love the natural look of the counter. I had the metal leg support manufactured by a local metal worker. We’d like to do something on the wall above the bar top, but have yet to figure out what that might be. We may still hang our little kitchen TV up there. The pendant lights give a nice rustic look that ties in well with the chandelier in the dining room.
I really like the thin metal transition strip between the wood and tile floor, even if it took me forever to find it online. I eventually was able to place an order through Floor & Decor.

The space between the kitchen and living room is so much more open – we love it. I often sit at the bar top facing the living room while eating my breakfast or lunch. We sanded, stained, and sealed the beam using a dark gel stain by Minwax.

I’m also quite excited about the plant hanging rail above the large window. I love plants, and so do the cats, so hanging plants are a great way to keep them from eating my plants. The rail is a curtain rod that I picked up at Target that is designed to look like the heavy duty metal iron pipe and flanges. I used some leftover trim to anchor it firmly to studs.

I’m so happy with the laundry room – having a utility sink is the best ever. The stacking washer and dryer are a LG steam set that we picked up during the holiday sales last year. The counter overhangs so that we can stash a hamper underneath.

The utility sink is stainless steel with a commercial style faucet. I really like the combo, although the first time I was using the faucet not in its holder, the spring caused it to fly up and spray me in the face. In our old kitchen we stored all over our souvenir magnets on the side of the fridge. I didn’t want to stop the tradition so I ordered a frame to fit a 2′ x 3′ piece of sheet metal and made a magnet board for the laundry room. I also hung a collapsible drying rack which has been quite handy so far. 
We got the chance to get a price break on our countertop if we purchased more, so we decided to do the half bath, which was originally out of scope. I also used the same paint as on the floating shelves to paint the cabinet. Since the paint was peeling, I had to strip everything, prime and paint. 
One final look back towards the dining room.
If you can’t tell, we’re quite happy with the end result and have had a great time entertaining family and friends in our new space.
Contractors, Suppliers, and Materials
Architect / Designer: Plumb Architecture. Denise did an amazing job taking our ideas and formulating a design that surpassed our expectations. She also consulted on colors with us to help us understand what palette would go best in our house.
Kitchen cabinets: Designed by UB Kitchens, Cabinets by Urban Effects. Although our cabinets had a number of issues arise during shipping, UB Kitchens provided phenomenal service making sure we were happy. The cabinets are beautiful, with both the darker lowers and the lighter uppers having a dry brush finish that has faint brush strokes.
Countertops: Geos Recycled Glass by Eos in White Birch. After a bad experience trying to order this from Home Depot, I ended up using Empire Countertops in Austin and definitely recommend them.
Backsplash Tile:
Faucets
- Kitchen: Delta Arc SpotShield Pull-down in Stainless Steel
- Laundry: Krause Commercial Style Stainless Steel Pre-Rinse Kitchen Faucet
- Half Bathroom: Delta Everly Spotshield in Brushed Nickel (also got matching hand towel and toilet paper fixtures)
Sinks
- Kitchen: Granite Composite sink by Blanco with 60/40 Split
- Laundry: Heavy duty 16 gauge stainless steel sink with strainer and sink grid
- Half Bathroom: Kohler Verticyl Rectangular Undermount Bathroom Sink
Cabinet pulls: Amerock Blackrock Satin Nickel in different sizes, including knobs for the bathroom
Lights
- Pendants: Kichler Brinley 4 3/4″ Wide Olde Bronze Mini Pendant
- Under Cabinet Lights – LED strips that can be picked up at any hardware store
- Can lights – LEDs supplied by our electrician
Floor tile: MSI Dimensions Graphite 12″ x 24″
Transition Strip: Schluter RENO-T Satin Nickel Anodized Aluminum 1in. 8ft. 2-1/2in. Transition
Plant rail: Drapery Pipe French Rod (curtain rod)
Stools: Ira 24″ counter stool
Wine Cooler: Frigidaire Gallery 46 Bottle Wine Chiller
Beer Fridge: GE 31 Bottle Wine / Beverage Cooler
Microwave: Frigidaire Gallery Countertop / Built in Microwave
Vent Hood: RA-14L30SS – (1) Windster RA-14L Series 30″ Vent Hood
