A Cornucopia Thanksgiving Feast

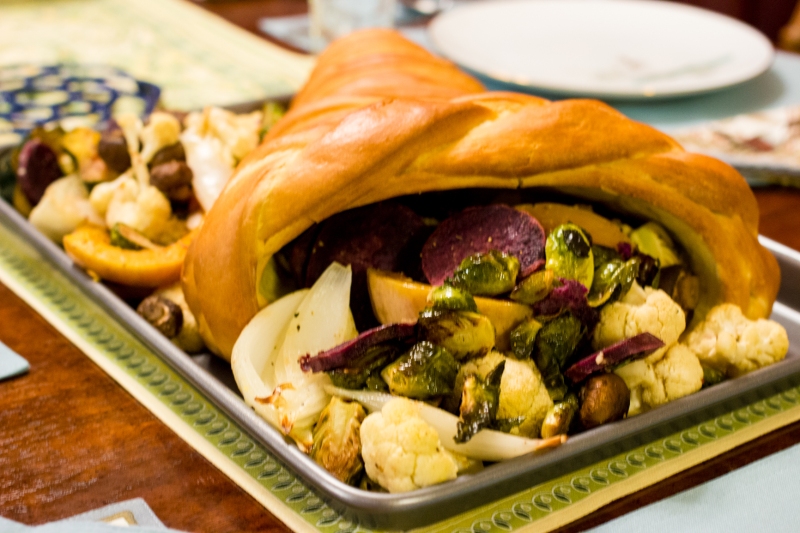
The cover of this year’s Thanksgiving issue of Vegetarian Times had the loveliest food I’ve ever seen: a bread cornucopia stuffed with colorful roasted vegetables. I knew I had to have it, so I made one for Thanksgiving! I mean, vegetables and bread are my two favorite things to eat, so there was really no way I wasn’t going to try it.

I started off following the dough recipe for the cornucopia. The dough rises overnight in the fridge into a massive amount so make sure you use a large bowl.

Thanksgiving-9

To create the cone of the cornucopia, you have to form a cone out of poster board and then cover it in foil and cooking spray.

Thanksgiving-8

I then used sections of the dough to roll it out into rectangular sheets, cutting 20″ x 1.5″ strips and then wrapping them around the cone while it was standing up, starting the bottom. The last bit of dough was used to create 3 additional strips and braid them. I laid the cornucopia on its side and then added the braided strip, so it did not go all the way around.

Thanksgiving-10

The cone then went into the oven. About half way, I had to remove the foil / posterboard cone from the dough, which was not the easiest thing to do.

In the meantime, we prepped many colorful veggies to prepare using the recipe Fork and Knife Roasted Vegetables. We used mushrooms, acorn squash, butternut squash, purple sweet potato, onion, and cauliflower. We also made the recommended Essence of Thanksgiving Gravy.

Thanksgiving-11Thanksgiving-12

We very carefully transported the cooled cornucopia to our friend’s house, and kept the veggies in a separate container until it was time to put everything together on the table. Thanksgiving-16

I was soooo pleased with the final result. And it was good too, not just pretty! Everyone ate a bit of the cornucopia bread, and we even took home the leftovers and continued to eat the bread with our thanksgiving leftovers until it was gone.Thanksgiving-17Thanksgiving-18
Ginger fig cake recipe

I recently made quite the birthday meal for my husband, making two of our favorite recipes, and trying out two new ones. I made Food & Wine’s Roasted beets with pistachios, herbs, and orange, Smitten Kitchen’s Swiss chard and sweet potato gratin and Mushroom Bourguinon and this Ginger fig cake, adapted from Kitchen Konfidence. I made the recipe healthier and also added figs and we loved it, so here it is for others to love!

Birthday foods-5 Continue reading

Lentil and Chard Ragout, a delicious winter meal

I recently made a recipe from a relatively new (to me) vegan cookbook Crazy Sexy Kitchen. I bought this cookbook after attending a Whole Foods Culinary class featuring Chef Chad Sarno, one of the authors. It was a good way to use up some of the chard growing in the garden and a handful of our fresh herbs. I added peppers and okra from our garden to the recipe, to use them up before they went bad. I used the beluga (black) lentils called for in the recipe, the first time I’d ever had them. Beluga lentils are smaller and denser than other lentils. It was a very healthy and flavorful meal that my husband and I enjoyed all week.

The recipe started by sautéing shallot and garlic in oil.

ChardRagout-2 ChardRagout-3

Next, deglaze the pan with sherry and add beluga (black) lentils. I had peppers from the garden so I threw those in to add some spice. Garden fresh okra also went into the pan.

ChardRagout-4

Add vegetable stock and simmer until the lentils are tender.

ChardRagout-5

After the lentils were tender, add the chard, frozen peas, nutritional yeast, lemon zest, parsley, thyme and salt and cook on low for a few more minutes.

ChardRagout-1

ChardRagout-6

At the end, stir in a bit of butter (vegan if that’s what you prefer) and cracked pepper. Yum!

ChardRagout-7

Enhanced by Zemanta

Split pea soup, my new favorite


Yellow split pea soup, ready to be eaten.

Yellow split pea soup, ready to be eaten.


This fall I realized that I love split pea soup, whether from a can of Amy’s or from the cafe in Whole Foods. Christmas leftovers gave me just what I needed to try making it at home. After reviewing a few recipes, I decided on this Cooking Light recipe. I used yellow split peas instead of green, leftover ham from our Whole Foods spiral sliced him, added some green onions because I had them, and omitted the lemon juice. I think this soup could easily be made without ham. The only item I had to get at the store was the split peas. A delicious way to use up leftovers.

First step - simmer water, broth, ham, split peas and onion for an hour

First step – simmer water, broth, ham, split peas and onion for an hour.

After an hour, adding the carrots and celery and then simmering for another 40 minutes.

After an hour, adding the carrots and celery and then simmering for another 40 minutes.

Completed soup.

Completed soup.


Enhanced by Zemanta

Making miso soup

For a while I’ve had some miso in the fridge. I knew I wanted to try making something with it again so I settled on making soup. I found this recipe from Vegetarian Times that appealed to me because of the variety of vegetables it includes. Of course, I made the decision to change it up so I got extra cremini mushrooms  in addition to the oysters, an extra white onion, a poblano pepper, and went for mustards greens instead of spinach since they were particularly pretty at the store and they’re a winter crop. The grocery store also conspired against me by not having any fresh ginger OR frozen edamame. The nerve!  Of course I also doubled or perhaps tripled the recipe so that it would last all week (and then some it turns out, must remember that I’m only feeding two people).

Anyhow, my version went something like this:

Slice 3 large carrots, one poblano pepper, onion, scallions (AKA green onions), and mushrooms and cook in minimal oil for a few minutes.

Add lots of water to the pot, bring to a boil. Add frozen peas in place of edamame, continue to cook for a few more minutes

Add mustard greens since they are a little tougher than spinach and I assume take longer to cook than the spinach called for in the recipe. Cook a few minutes.

Reduce heat, add rice noodles that had been soaking in water and powdered ginger. I just tend to wing it with ginger since I’m a fan of the spice.

Blend a bunch of brown miso in some warm water with a mini whisk or fork. Add miso, sesame oil, and soy sauce to pot.  Allow to simmer for a while. Taste and adjust flavors as needed. Of course, soups are always better the next day. We ended up adding sriracha to our individual bowls to make them a bit spicy.

Turned out pretty well, overall. Definitely more flavorful than many other soups I’ve made. And probably pretty healthy with all of those pretty veggies…


Enhanced by Zemanta

Making a quinoa loaf

The holidays this year have been crazy. We didn’t even have time to make our typical multi course holiday meal to enjoy slowly throughout many days. Instead I settled on making one dish that was somewhat festive. To avoid using meat, I found this whole foods recipe for a quinoa loaf with mushrooms and peas.  I didn’t get that many pictures, but you basically make a paste with oatmeal and chickpeas and then stir in the mushrooms, peas, onion, sun dried tomatoes, and quinoa. To bake it, the mixture is pressed into a loaf pan:

After baking:

The loaf was good, but definitely go heavy on the spices and add any additional spices that you like. To reheat slices, I first heated them in the microwave and then browned the outside on a pan so that it would be toasted. We added either some hot sauce or tapenade to the top.

Enhanced by Zemanta

A dinner made with beer

Recently we were on a salad eating kick, and we always like to have a slice of nice bread with our salad. However, we were out of bread so I decided to whip up a batch of beer bread yet again. This time I tried a recipe from Farmgirl Fare. I made the Garlic Herb version with a bottle of Avery White Rascal.

I skipped the glaze. It turned out pretty well, especially toasted with some butter.

Because it’s starting to feel like fall, I settled on making french onion soup for dinner this week. I wanted to make a vegetarian recipe, so I modified this recipe from the Craftzine blog. My modifications were:

  • Cooking the onions with a small amount of vegetable broth rather than a slew of butter
  • Using a bottle of Maredsous along with the vegetable broth to make the stock, instead of sherry. I used 4 cups of vegetable broth, one bottle of beer and probably about one extra cup of water to make sure we would have enough broth to go with all of the onion
  • I added dried thyme to the broth for some extra flavor
So many onions:
After simmering with the beer vegetable broth:
I then ladled the onion soup into a soup crock, topped it with a slice of the beer bread mentioned earlier, and covered it with cheese. After baking in the oven for a few minutes and then using the broiler to finish the top, it was ready to eat!

Making stuffed acorn squash with leftover rice

Since it’s fall squash season, I randomly came home from the grocery store with an acorn squash and no plan for what to do with it. That same week, we made a curry with some texmati rice (kinda like basmati rice, but made in Texas I think.) We ended up with quite a bit of left over rice so I decided to see if I could improvise a stuff squash recipe. It turns out that I can!

In order to make the filling flavorful I started by cooking some onion, dried cranberries, and garlic in vegetable broth (also conveniently left over from the curry). Cranberries are a nice complement to the sweet acorn squash.

After the onions softened, I added carrots and the leftover rice.

I simmered that mixture until the liquid was mostly absorbed by the rice and vegetables so that the filling would be creamy. When it was almost done, I threw in a few handfuls of spinach to wilt.

While this was all going on, I cleaned the seeds from the inside of the acorn squash and baked the two halves upside down in a pan with about 1/4 inch of water in the bottom until the squash was soft.

I filled the two halves with the rice mixture and topped with some Cotija cheese. Yum!

Making applesauce… it’s really easy!

This time of year always makes me long for fall in northern Ohio, the land of apple orchards. OK, maybe not THE land of apple orchards, but A land of apple orchards which is more than I can say about central Texas.  I think to myself, surely good, cheap apples will show up in the grocery stores in the fall, but they never really do. That doesn’t keep me from making up a few batches of applesauce though!

I’ve never canned my applesauce, I just make enough to refrigerate and eat in a week or two. Typically I use around 5 – 7 apples, but if you are feeding more people you can use more.

I always start with a sweet variety of apples (often Fuji or Gala because they are easy to find here), mostly because I don’t like tart apples.  If you start with sweet apples, you don’t have to add much sugar at all. And you can snack on bits of them as you’re cutting them up.

After washing my apples, I start with a handy-dandy apple corer / slicer / peeler contraption from Williams Sonoma given to me by my mother-in-law. I love everything about this tool except having to clean it when I’m done. It’s made out of metal and is very solid and it suctions to the countertop. You can choose not to peel the apples if you don’t want to.

Williams Sonoma Apple Corer Peeler Slicer

The most awesome tool for coring and slicing apples.

The apple is loaded onto the corer.

Turn the crank to slice the apple.

And then you're left with the core mounted on the corer and nice round slices of apple to use.

I like my applesauce with the skins in it, but I find if I leave the skins on all of the apples, it’s a little overkill. Instead, I typically leave the skins on about half or a little more than half of the apples and peel the rest. I hand out bits of apple that don’t get used to my dog, she likes apples as much as I do.

Next up is putting the apples in a pot with some water.  For 5 apples, I start with about one cup of water and add more towards the end if needed.  I also add a healthy dose of cinnamon, the best spice ever, and a sprinkling of ginger and brown sugar.

Put the heat on medium, cover and let cook. If it starts to boil, turn the heat down to low.

Partially cooked apples

It takes probably about 30 – 40 minutes to fully cook the apples.  Once they are soft enough, mash them up with a utensil in the pot. I use a wooden spoon or plastic potato masher. Check the consistency and add more water and cook longer if needed.  Taste test and add more spice or sugar. Go light on the sugar though, because not much is needed at all.

The finished product!

Last – eat some warm, refrigerate the rest and enjoy the rest of the week!