A Cornucopia Thanksgiving Feast

The cover of this year’s Thanksgiving issue of Vegetarian Times had the loveliest food I’ve ever seen: a bread cornucopia stuffed with colorful roasted vegetables. I knew I had to have it, so I made one for Thanksgiving! I mean, vegetables and bread are my two favorite things to eat, so there was really no way I wasn’t going to try it.

I started off following the dough recipe for the cornucopia. The dough rises overnight in the fridge into a massive amount so make sure you use a large bowl.

Thanksgiving-9

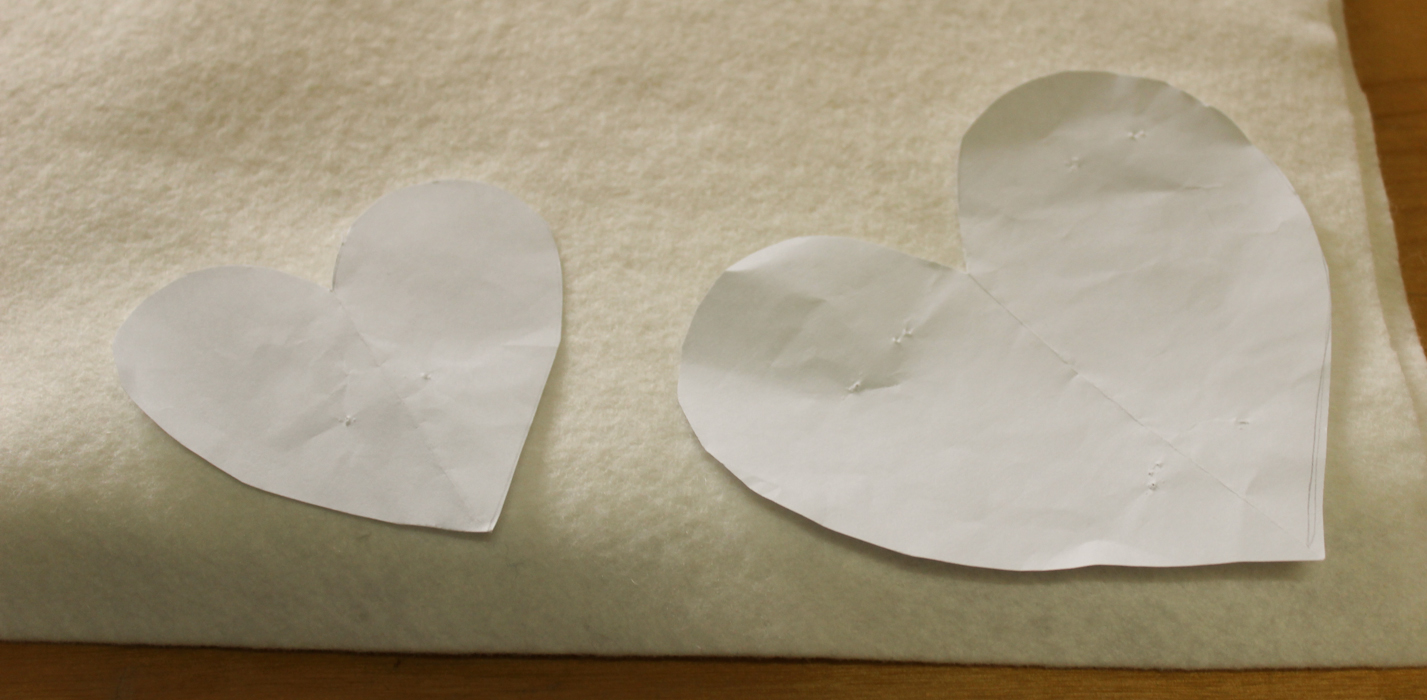
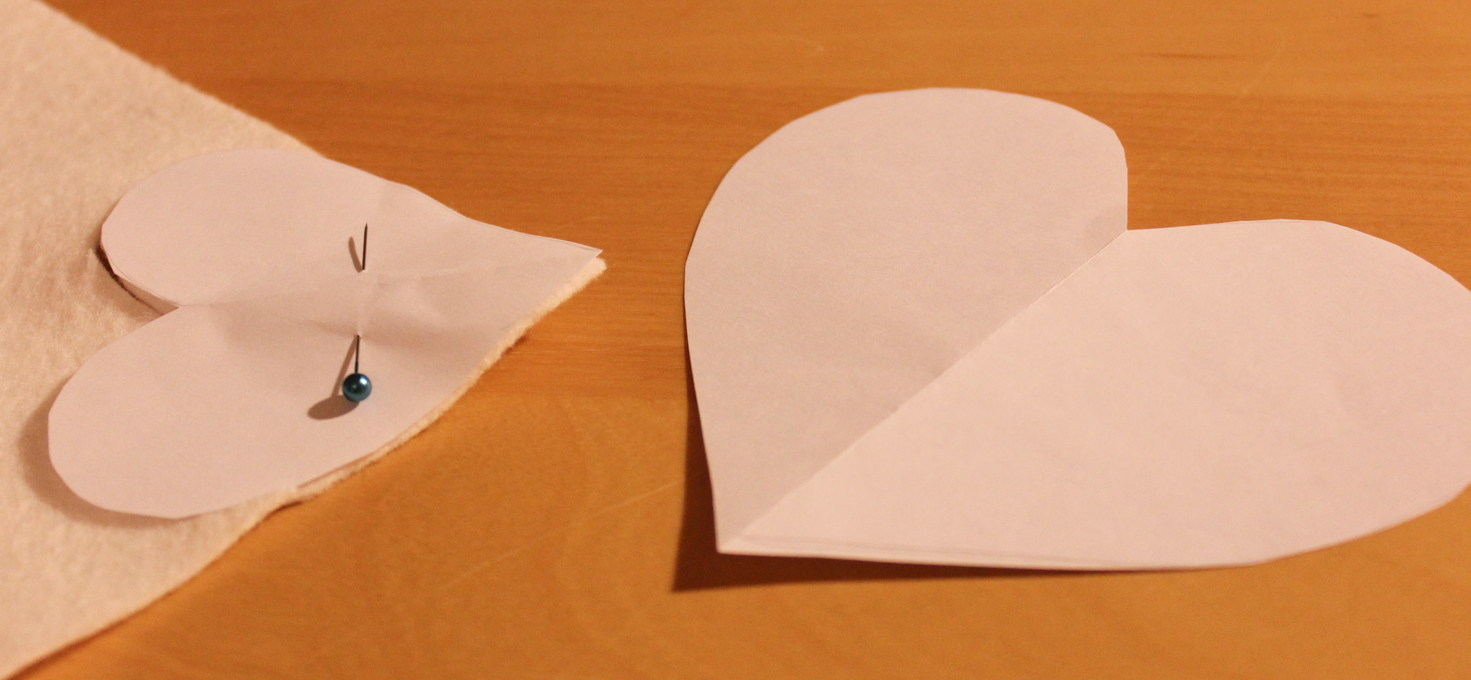
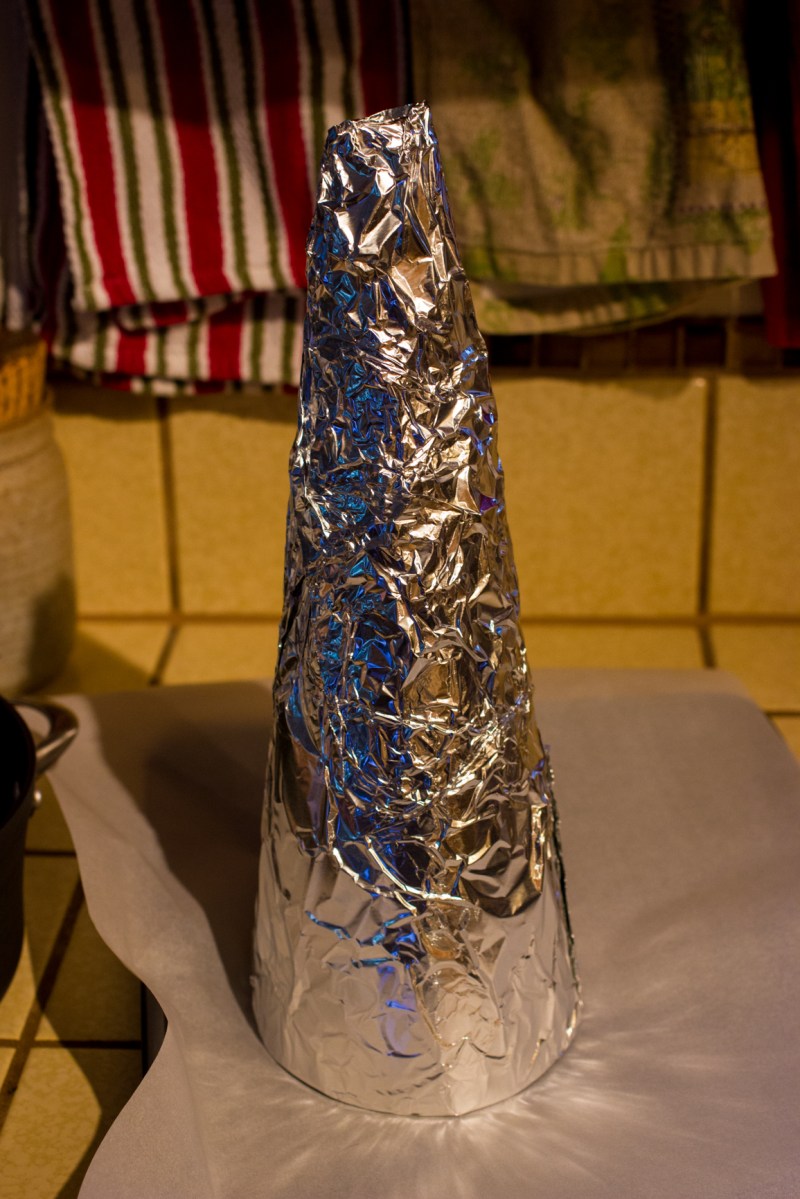
To create the cone of the cornucopia, you have to form a cone out of poster board and then cover it in foil and cooking spray.

Thanksgiving-8

I then used sections of the dough to roll it out into rectangular sheets, cutting 20″ x 1.5″ strips and then wrapping them around the cone while it was standing up, starting the bottom. The last bit of dough was used to create 3 additional strips and braid them. I laid the cornucopia on its side and then added the braided strip, so it did not go all the way around.

Thanksgiving-10

The cone then went into the oven. About half way, I had to remove the foil / posterboard cone from the dough, which was not the easiest thing to do.

In the meantime, we prepped many colorful veggies to prepare using the recipe Fork and Knife Roasted Vegetables. We used mushrooms, acorn squash, butternut squash, purple sweet potato, onion, and cauliflower. We also made the recommended Essence of Thanksgiving Gravy.

Thanksgiving-11Thanksgiving-12

We very carefully transported the cooled cornucopia to our friend’s house, and kept the veggies in a separate container until it was time to put everything together on the table. Thanksgiving-16

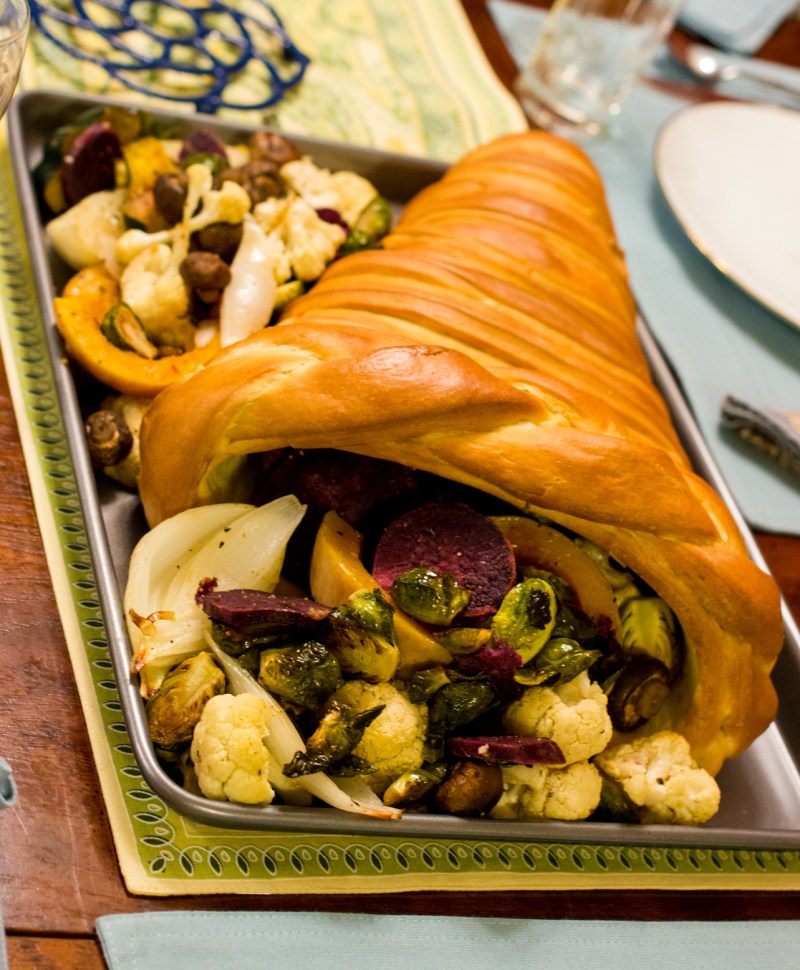
I was soooo pleased with the final result. And it was good too, not just pretty! Everyone ate a bit of the cornucopia bread, and we even took home the leftovers and continued to eat the bread with our thanksgiving leftovers until it was gone.Thanksgiving-17Thanksgiving-18

The cutest ornaments: Almond shell birds

My handmade holiday ornaments for last year were these little almond shell birds, and they were a big hit. I followed the instructions pretty much line by line, but instead of shellac to seal my almond shells, I used a matte Delta Ceramcoat sealant that I had left over from a wood painting project. I made at least 10 of these little guys and am happy to have a few left over to hang on my tree this year.

We even held a little photoshoot for a few of them:

Almond_Bird_Ornaments-3


During the outside portion of the photo shoot, we were photo bombed by my favorite photo bomber. Do you see her?

Almond_Bird_Ornaments-5

Almond_Bird_Ornaments-4

Almond_Bird_Ornaments-6


Acorn jingle bell ornaments

Simple hand-embroidered ornaments

Hand-painted wooden ornaments

Beer cap ornaments

Simple felt hand-embroidered ornaments

I’ve gotten into the habit of making ornaments each year to give to my family as gifts. Last year I made simple hand-embroidered felt ornaments after seeing this post from nini on Pinterest. Once I got started, I ended up making two kinds, one with 3 hearts like nini made and another with just 2 hearts.

Embroidered ornaments, one uses 3 hearts and the other uses 2 hearts.

Embroidered ornaments, one uses 3 hearts and the other uses 2 hearts.

To make these ornaments, I used the following supplies:

  • Off white felt fabric
  • Red embroidery floss and appropriate sewing needle
  • Red ribbon
  • Vanishing fabric marker
  • Paper to make a pattern, pins, scissors

The first step was to create my heart patterns. I made two different sizes for the two ornaments. I used the elementary school trick of folding my piece of paper in half and then drawing half of a heart and cutting it out to make sure that my patterns were symmetrical.

The two different heart patterns for the ornaments

The two different heart patterns for the ornaments

Next, I pinned down the hearts and cut the fabric.

Pinning down the heart pattern to cut the fabric.

Pinning down the heart pattern to cut the fabric.

I used the large pattern for the ornament with two hearts and the small pattern for the ornament with three hearts.

I used the large pattern for the ornament with two hearts and the small pattern for the ornament with three hearts.

Once the hearts were cut out, I used a vanishing fabric marker to draw the word I wanted to embroider on each heart. The ink vanishes quite quickly, so I drew each word right before embroidering.

Drawing the word before embroidering.

Drawing the word before embroidering.

Next, I used a simple backstitch to embroider the word.

Embroidered words for the ornaments.

Embroidered words for the ornaments.

For the ornament with two hearts, I matched them up and then did a simple stitch around the edges. I found it easiest to add the ribbon for hanging the ornament if I positioned the ribbon before I finished sewing the hearts together. I also used some scrap felt in the middle of the ornament to add a bit of “puff”.

Sewing the edges together.

Sewing the edges together.

One side of the larger ornament.

One side of the larger ornament.

Side two of the larger ornament.

Side two of the larger ornament.

For the ornament with three hearts, I sewed together the straight edges of the smaller hearts so that they formed a sort of triangle shape. I also used the red thread to to attach the three hearts at their apex and then looped the hanging ribbon around that thread. This also made it so that you don’t see the back side of each heart when you look at the ornament from the top.

Ornament using three hearts.

Ornament using three hearts.

The ornaments were well received by their recipients last year 🙂

Enhanced by Zemanta

Pet-proofing the Christmas tree and decorating the tree stand

Ok, so there’s really no such thing as pet-proofing a Christmas tree, but at least I can keep it from being knocked down. Our fake Christmas tree is short, only about 5 feet tall, so years ago we made a 4′ x 4′ platform about 18 inches tall to raise the bottom of the tree so that the entire tree can be seen from outside the window. After our dog and a foster dog collaborated to knock the tree off the platform one year, we quickly anchored the base of the tree to the platform using some large U shaped bolts. So now each year before we assemble the tree and put down the tree skirt, we tighten the U bolts around the three legs of the tree stand to make sure that nothing will happen to the tree laden with our precious ornaments.

This year we broke out the tree stand in our new house and I realized that the cloth covering I sewed for the stand years back no longer worked. It was designed to go on the stand when only 2 sides of the stand could be seen. Now, you can see 3 sides of the stand. I took a quick trip to Joann fabrics to pick up some white eco-fi felt to cover the stand and some decorative garland accents to make it less plain. I then cut the felt to have enough to cover the entire 4′ x 4′ top of the stand, with a bit of overlap on each side (more on the side that no one can see, since I didn’t cover that with a “skirt”). I cut rectangles of felt to hang from the top of the stand to the floor, with a bit of extra so that I could fold it over at the top. I fastened the tree stand skirts with my staple gun and then added the garland to each side, also fastening with the staple gun. We then cut the felt on the tree stand where the U bolts went though and proceeded to fasten the tree and decorate it. Now if only I could keep the cats from getting their fur all over my nice new white felt….

Overall view of the tree, tree stand, and white felt and garland used to decorate the stand.

Overall view of the tree, tree stand, and white felt and garland used to decorate the stand.

Close up view of the tree stand. You can see how the felt is simply folded over at the top and secured with a staple gun. The bottom of the felt is already wavy from cats crawling under the stand. It's amazing how difficult it is to avoid having pets in my pictures at home.

Close up view of the tree stand. You can see how the felt is simply folded over at the top and secured with a staple gun. The bottom of the felt is already wavy from cats crawling under the stand. It’s amazing how difficult it is to avoid having pets in my pictures at home.

Enhanced by Zemanta

Making myself festive

This past weekend we had a holiday party to attend. Not just any holiday party, but an ugly Christmas sweater party. Unfortunately, I seemed to have purged my wardrobe of all ugly holiday sweaters many years back. On that same day, I just happened upon this blog post on Craft about how to make a festive headband. Since I have a ton of craft supplies, I had everything needed to make myself a silly holiday headband but the headband itself. A quick stop at Walgreens to pick up a headband (and a blinking Christmas pin as an accessory) and I was ready to do some last minute crafting!

I wrapped my headband first in some shimmery white ribbon, held in place by hot glue, and then added a red ribbon accent.

Finally, I used some red tulle to tie on a big bow. Just in time for the holiday party!

Enhanced by Zemanta

Beer cap ornaments

I have a HUGE collection of beer caps because not only do we drink a lot of beer in our house, our friends also save their caps and give them to me. Because we have a beer theme going on in our house, I got the idea to make Christmas ornaments with beer caps. Here’s how I did it – make some of your own!

Supplies:

  • Ornament hooks (I found some fancy ones at World Market last year)
  • Beer caps (preferably holiday themed or colored)
  • A drill
  • Some easy to bend wire
  • Scissors
  • Small pliers (I have some jewelry pliers)

Process:

First, I sorted my caps. I made each ornament from 3 matching caps. Here you can see my supplies:

Next, I drilled holes in the caps. For each set of three caps, I drilled two holes in two caps and one hole in the third cap. The third cap is the bottom cap so it only needs one hole.

Then I used the wire to attach the caps together. I just twisted the wire together on the back side of the caps and cut off any excess. I made sure to point the wire ends toward the cap so it wouldn’t scratch anyone. For the top cap, I used a longer piece of wire so that I could make a few twists before attaching the ornament hook. That way, the directions that the caps faced could also be adjusted relative to the hook direction.

The finished product!