A fig roundup #2: Baked goods

It’s time for another fig roundup! Unfortunately it appears that our trees are done with figs for the season. The fruit flies have thoroughly infested them. Before the flies were everywhere we ate figs in a number of different ways.

One of the first ways we at them was broiled with goat cheese and a variety of different toppings. Crushed pistachios, honey, fig balsamic, prosciutto… it’s all good.  Fresh figs are also tasty added to salad and eaten with a balsamic style dressing.

I also made fig compote, fig balsamic reduction, and fig infused vokda in addition to freezing a batch of figs. I haven’t used the frozen figs yet.

Figs make a great addition to baked goods.

Fig muffins

To make the muffins, I started with a basic breakfast muffin recipe and changed it quite a bit.

Ingredients:

  • 2 cups whole wheat flour
  • 2 teaspoons baking powder
  • 1/2 teaspoon salt
  • 1 teaspoon cinnamon
  • 1/2 teaspoon ginger
  • 1 teaspoon vanilla
  • 1 egg
  • 3/4 cup milk
  • 1/4 cup vegetable or canola oil
  • 1/4 cup honey
  • 1/4 cup brown sugar
  • 2 cups chopped figs

Instructions:

Combine dry ingredients in large mixing bowl. Mix in chopped figs. Combine egg, milk, oil, brown sugar and honey and beat well. Add to dry ingredients, mixing until just moistened. Spoon into greased muffin pan, filling 2/3 full. Bake at 400 degrees for 18-20 minutes.

Next time I might use more brown sugar or all brown sugar and no honey to make them just a tad bit sweeter. Regardless, the muffins were very good. Because we weren’t able to eat them all right away, I froze a few and have been eating them for breakfast on the weekends.

Dry muffin ingredients

Wet muffin ingredients

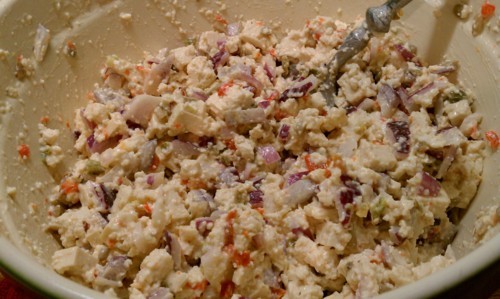
Fig chunks mixed with dry ingredients

Batter ready to go

Prior to baking

After baking

Delicious fig chunks on the inside


Fig cake

Never content to use a recipe just as it’s called for, I modified this fig cake recipe to my liking.

Ingredients:

  • 2 cups mashed figs
  • 2 cups sugar
  • 1/4 cup oil
  • 1/2 cup applesauce
  • 4 eggs
  • 2 cups + 2 tablespoons flour
  • 1 tsp cinnamon
  • 1/2 tsp ginger
  • 1 tsp baking soda
  • Additional fig slices for topping

Instructions:

Mix together sugar and wet ingredients. Combine dry ingredients and add to wet ingredients, mixing well. Oil and flour a cake pan (I used two 9″ round pans). Bake in 350 degree oven for 45 minutes. With about 15 minutes left, remove cakes and add fig slices to top. The cake will be golden brown on the top when finished. Check with toothpicks to see if the center is finished.

Mashed figs

Cake batter

In the pan

Delicious fig cake, after adding the fig slices, before the baking is finished. Somehow didn’t end up with a picture of the finished product.


Enhanced by Zemanta

Making apple crisp, a simple but delicious dessert

I used to make an apple crumb pie for Thanksgiving. It was good, but I don’t really like to mess around with real pie crusts so I always just bought a frozen crust. That was probably the downfall of my pie.

Then one magical day, I discovered the world of making apple crisp. Ok, so someone else actually made it and I was so enamored that I had to have the recipe. She obliged and now it’s one of my favorite fall and winter desserts to make. I’ve changed up the recipe a bit to add more spice of course.

Apple filling:

  • 5 – 6 Medium to large apples – I like to use sweet apples like Gala, Braeburn, Jonagold, Cameo, Fuji, etc.
  • 1/4 cup water
  • Cinnamon and ground ginger to taste

Topping:

  • 1 cup brown sugar
  • 1/3 cup butter, softened / melted
  • 3/4 cup flour
  • 1/2 cup oats
  • 1/4 tsp salt
  • Cinnamon and ground ginger to taste

Directions:

Chop apples. Peel them if you like, but I like to leave the peels on. Place in a baking dish and toss with water, cinnamon and ginger.

Combine topping ingredients. Stir together by hand until combined. No mixer required.


Spread topping on top of apples. Bake at 350 for 45 minutes or until apples are soft. Hard apple cider in a Christmas glass is optional, but highly recommended for the cook.

It was so good I didn’t even get a picture of it before it was partially eaten.

Enhanced by Zemanta

Spaghetti squash, my new favorite squash

At some point I realized that Alamo Drafthouse, the awesomest of movie theaters, included a dish on their menu called “spaghetti squash and pomodoro sauce”.  Since the dish was both vegetarian and featured a new to me squash I had to try it. I think I’ve now eaten it on 3 out of my last 4 Alamo trips because it is delicious. It’s basically squash topped with mushrooms, sauce and parmesan.

Well this week I decided I wanted to make my own spaghetti squash dish, so I did. I got a giant squash at the grocery store that fed two of us for two nights.  I sliced it open and cleaned it out, kind of like a pumpkin. It then had to go into two separate baking dishes – I baked it for about 50 minutes, sliced side down, with a bit of water in the bottom of the pan.

While the squash baked, I assembled my ingredients, sauce, mushrooms, onion, and a red pepper.  If you’ve never tried Newman’s Own “Sockarooni” sauce, I highly recommend it. It has a slight fresh garden and spicy flavor and is just plain good. Newman’s Own also donates their profits to charity so that makes me happy.

I sautéed each vegetable separately in a touch of olive oil, being careful not to over cook them.

After all of that, the squash was about done. I could tell because when I scraped the inside with a fork, the squash easily pulled apart into spaghetti looking strands.

I served a quarter of the squash topped with the mushrooms, onion, red pepper, sauce and cheese.  It was quite delicious. I really like the slightly crunch texture of the squash strands.

Zucchini bread tastes like fall!

Well, only in Austin do we call the high 80s / low 90s “fall-like” temperatures.  After months of well over 100 degree temperatures, this coolness is odd. Baking in the hot hot summer months is rather impractical, but now that my AC doesn’t have to strain as hard, I decided it was time for some zucchini bread.

I’m not sure what makes zucchini bread quite so delicious as the only flavors are cinnamon, vanilla, and zucchini. Some how these combine with the ordinary ingredients to create pure deliciousness.

As I like to pretend that my baking is healthy, I used this recipe from Cooking Light.  However, I didn’t have any applesauce so I used plain yogurt instead (as I do in banana bread as well). I also used 2 real eggs instead of egg substitute and added extra cinnamon.

Beside the step where you shred the zucchini, this recipe is extremely easy to make. You don’t even have to break out the mixer, you can mix the ingredients by hand.

Shredded zucchini draining on paper towels:

Zucchini, egg, yogurt, and vanilla combined:

The instructions say to hollow out the center of the dry ingredients and then add the wet ingredients to combine, so that’s what I did:

And then mixed it all up:

The end result:

This turned out so well that when I told my husband to eat as much as he wanted, he ate almost half of a loaf!

It’s hatch green chile time!

Here in Austin, the grocery stores get excited each year at this time for hatch green chiles to arrive from Hatch, New Mexico. I have no idea if this is a thing in other parts of the country or not.  The grocery stores offer both fresh and roasted hatch chiles and a variety of other hatch flavored foods.  Chuy’s even makes a special menu that we always go check out.

For dinner this week, I decided I wanted to make something with hatch chiles for the first time in my 9 years in Austin. I decided on a play off of chicken salad that uses tofu instead. I combined extra firm tofu, patted dry, with diced red onion, roasted hatch chiles, sunflower seeds, and mayo.  We ate the tofu salad as an open faced sandwich on a slice of sourdough bread topped with a slice of heirloom tomato.  Man, did they turn out spicy! I used 6 roasted chiles, 3 of them mild and 3 hot.  On the side, I made roasted cauliflower tossed with olive oil and rosemary from our garden. It’s really the only thing left alive.

I decided that while the 110 degree air outside probably could roast the cauliflower and chiles, it most likely would take too long.  Instead, I fired up the grill and roasted them myself.

Cauliflower and chiles, ready to roast:

After roasting:

I then had to remove the skins from the chiles because they are quite crisp. Luckily my husband mentioned that because I was ready to leave them on.

Tofu, onion (at the bottom) and the chiles ready to go:

Mixed with mayo and sunflower seeds:

Served open-faced with a slice of heirloom tomato:

All in all, a quite tasty sandwich. Sometimes I feel that food made with hatch green chiles isn’t all that exciting. However, I definitely enjoyed this sandwich, especially after my mouth stopped burning.

Making stuffed berries

I came across a post on Craftster via the Craftzine blog about a super easy no bake summer dessert that I decided to try.  The chocolate chips I got for the raspberries were a tad bigger than normal and sometimes were difficult to get in the berries without splitting them.  With the help of a strawberry huller, the no bake cheesecake filled strawberries turned out great! I plan to take them to a party for others to enjoy 🙂

Making… Smores pie?

What’s a Smores pie you say? Well, it’s down right delicious of course! The second I saw it in my Vegetarian Times magazine, I knew I had to make it. Memorial Day seemed like the perfect occasion!

Vegetarian times taught me that marshmallow fluff is vegetarian! No gelatin like normal marshmallows (this is good for my vegetarian friends).

My husband consented to allow me to use his Malley’s dark chocolate that was still left from Valentine’s Day. Malley’s is a delicious chocolate company in the Cleveland area.

I had to break it up and put it in a bowl:

Heat soy cream to a simmer:

And then pour the soy cream over the chocolate and whisk in one egg, some vanilla and a pinch of salt:

The chocolate mixture was then poured into a prepared graham cracker crust and baked for 25 minutes. The edges of the pie crust were covered with foil to keep them from getting too brown.

After cooling for an hour it was time to “spread” on the marshmallow fluff.  Well, marshmallow fluff is not the kind of stuff you spread. It’s more like a plop:

Somehow I spread it out enough and then put it under the broiler until it was brown on top:

The finished product was very rich and delicious. Definitely more flavor than a campfire smores!

Making garden herb infused olive oil spread

Sometimes we like to make little personal pizzas on top of flatbread for dinner. Instead of pizza sauce, we tend to use olive oil or hummus.

Our garden is somewhat sad this year due to the crazy drought we’ve been having but at least the herbs are doing well.  I picked some thyme, oregano, garlic chives and rosemary from the garden to start with:

I then stripped the thyme, oregano, and rosemary leaves from their stems and sliced up the chives and put them in my mortar:

I proceeded to use the pestle to crush up the herbs:

and then mixed in olive oil:

We spread this concoction on our flatbread pizzas and we could definitely taste the herbs after the pizzas finished cooking. Yum!

Making a summer cocktail

I guess it’s not officially summer yet, but in Texas it feels like it’s been summer for months. You may remember the vodka infusions I made recently.

I finally got to try the watermelon rosemary infusion and I must say, it was delicious. I used the Rosebud recipe from Kitchen Konfidence.  It was fun to muddle the watermelon with the crushed ice:

I used rosemary sprigs from the gigantic rosemary bush in the backyard. Rosemary grows like crazy in Texas:

Yum! I recommend seedless watermelons if you can. I still had to strain out the little seeds from the glasses.

Making cheese and chocolate fondue

Cheese and chocolate fondue for Valentine’s day. This is the second year for cheese fondue and the third for chocolate fondue. I declare it therefore to be our Valentine’s Day tradition. The tradition guarantees that we will use our fondue pot from Switzerland at least once a year which was an awesome wedding gift (despite the fact that the first time I picked it up, the handle broke off).

I never thought I liked cheese fondue. In fact, I don’t like cheese fondue made with wine. We learned last year that cheese fondue made with beer is far superior to fondue made with wine so now we make it with beer.

To make the cheese fondue, we combined cheddar, Gruyere, and Emmentaler cheese with a bit of flour, mustard, Worcestershire sauce and Sierra Nevada Glissade beer. Well, that was after an emergency trip to Bed Bath and Beyond for the sterno fuel needed to keep the pot warm.

Cheese!

Beer!

Melting cheese!

For some reason the fondue did not melt together quite as well this year as last year but it was still quite tasty.

We ate the fondue with cauliflower, broccoli, carrots, and zucchini that I blanched in boiling water as well as baguette bread and mini dill pickles. Yum! We drank Boston Beer Company Infinium along with our fondue.

For our dessert, we made chocolate fondue. Ok, so it really was just melted milk chocolate.  Apparently real chocolate fondue has cream in it but that was not something I realized. The chocolate fondue pot is a little heart shaped dish that is kept warm by a tea light candle

In our chocolate we dipped strawberries, banana, grapes, mini marshmallows and mini ginger crisp cookies.

The best part? The left overs we will eat again on Monday which is the actual Valentine’s day!